A clunk over bumps most often signals a worn suspension joint or mount, commonly a sway bar end link, a strut mount, or a control-arm bushing. If the steering feels loose, the wheel appears to lean, or the vibration is severe, the vehicle needs to be towed rather than driven. Everything else can typically wait for a scheduled inspection, and the checklist below narrows the likely part before that visit.
TL;DR:
- Worn sway bar end links are the most common cause of front-end clunks, producing sharp metallic noises most noticeable at low speed or during turns.
- Movements in components like control-arm bushings, ball joints, or strut mounts generate different sounds and often develop gradually, indicating ongoing wear.
- Non-suspension issues such as loose exhaust hangers, heat shields, or engine mounts can mimic suspension noises but tend to change with engine load.
- Proper diagnosis involves tests like push-down rebound, wheel rocking, and end-link probing performed from outside the vehicle, with accurate symptom logging.
- Immediate towing is necessary if the clunk is accompanied by loose steering, wheel leaning, or severe vibrations, but minor bump-only noises can often be safely driven to a mechanic.
Table of Contents
- Common Causes of a Suspension Clunk Over Bumps
- How to Diagnose a Front End Clunk Over Bumps at Home
- When a Suspension Knock Over Bumps Means Stop Driving
- Suspension Repair Cost Ranges to Expect
- Preventing Suspension Clunks Before They Start
- What a Professional Suspension Inspection Involves
- Sources
- FAQ
Common Causes of a Suspension Clunk Over Bumps
Six components account for nearly every clunk-over-bumps complaint, and each one produces a slightly different sound signature. Learning to tell them apart saves diagnostic time and, often, money.
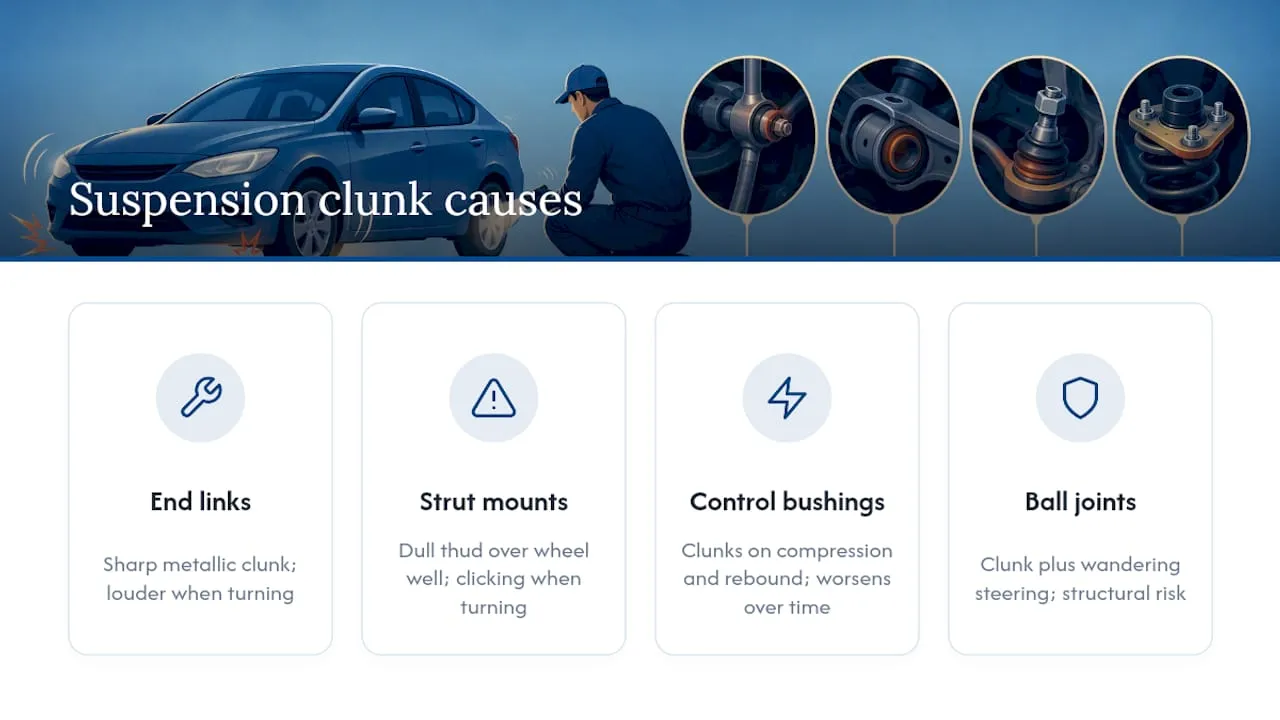
Sway bar end links are the most frequent offender on the front end. These small linkages connect the sway bar to the strut or control arm, and their ball joints wear out faster than almost anything else in the suspension because they flex with every steering input and every bump. A worn end link produces a sharp, metallic clunk, usually most noticeable at low speed over speed bumps or potholes, and it often gets louder when turning because the sway bar loads unevenly. Sway bar end links, strut mounts, and control arm bushings account for the majority of front-end clunks, and end links are typically the cheapest of the three to replace.
Strut mounts and bearings sit at the top of the strut assembly, where it bolts to the body. When the rubber isolator in the mount separates or the bearing seizes, you get a dull thud or knock right over the wheel well, often paired with a faint clicking sound when turning the wheel slowly in a parking lot.
Control-arm bushings are the rubber or polyurethane sleeves that let the control arm pivot without transmitting every road impact into the frame. Once they crack, dry out, or separate from the metal sleeve, the arm develops slack and clunks on both compression and rebound. This is often the noise that gets louder over time rather than appearing suddenly.
Ball joints connect the control arm to the steering knuckle and carry the vehicle’s weight through every suspension cycle. A worn ball joint can produce a clunk over bumps, but it also tends to introduce a vague, wandering feeling in the steering. This is the one failure on this list with real structural risk attached.
Tie rod ends link the steering rack to the knuckle. Wear here shows up as a clunk specifically when turning, along with steering play you can feel by wiggling the wheel at rest. A clunk accompanied by loose or wandering steering often points to ball joint or tie-rod failure and should never be dismissed as a minor noise.
Worn shocks or struts don’t usually clunk on their own, but once the damper loses its ability to control spring motion, the suspension can bottom out against its internal travel stops. That produces a dull thud rather than a sharp knock, and it tends to show up on rougher roads or after hitting a larger dip. Integrityautoinc’s shock absorbers and struts guidance covers how mounting hardware and damper wear interact to create this specific symptom.
Statistic Callout: Excessive clearance in worn suspension joints, from loose nuts to dried rubber bushings, is the most commonly cited cause of clunks and rattles across diagnostic guides, which is why the majority of front-end clunk complaints trace back to end links, mounts, and bushings rather than more expensive structural parts.
Sounds that aren’t actually suspension
A surprising number of clunk complaints turn out to have nothing to do with the suspension at all. Three imitators show up again and again:
- Exhaust hangers and heat shields. A cracked rubber hanger lets the exhaust pipe swing and contact the frame or floor pan, producing a metallic clunk that often changes with engine load rather than road surface.
- Engine and transmission mounts. A delaminated mount lets the powertrain rock on acceleration or deceleration, creating a thump that can be mistaken for a front suspension clunk, especially on front-wheel-drive vehicles.
- Loose hardware. Skid plate bolts, spare tire mounts, and even loose battery trays can produce a bumps-only clunk that has nothing to do with ride control.
Engine and transmission mounts that have delaminated can create thumps that closely mimic suspension failures, and checking Integrityautoinc’s engine mounts page is a useful reference point before assuming the worst about the suspension itself. A quick way to separate exhaust noise from suspension noise: exhaust and mount clunks often change character with engine load, showing up more at cold start or light throttle, while true suspension clunks stay consistent regardless of what the engine is doing.
How to Diagnose a Front End Clunk Over Bumps at Home
Before touching anything, park on level ground, set the parking brake, and chock the wheels. Never place any part of your body under a vehicle supported only by a jack. Every test below is designed to be performed from outside or beside the car.
Pro Tip: Write down the exact conditions that reproduce the clunk, including which corner, what speed, and whether you were turning or braking. Accurate symptom logging reduces exploratory diagnostic time and cost when you eventually hand the car to a technician.
- Push-down rebound test. Push down firmly on each corner of the bumper and release. A single clunk on the rebound often points to a mount or end link. More than one oscillation before the car settles usually indicates a worn shock or strut that needs replacement rather than a simple bushing.
- Wheel rock test. With the wheel off the ground or the vehicle safely supported, grab the tire at the 12 and 6 o’clock positions and rock it top to bottom. Movement here suggests a worn wheel bearing or ball joint. Then grab at 9 and 3 o’clock and rock side to side, which isolates tie rod end play. Watching the ball joint itself while an assistant rocks the wheel reveals visible movement at the joint’s socket, which is the clearest confirmation of wear you’ll get without a lift.
- Hand-probe the sway bar links. With the car on the ground, reach up and grab each end link and try to move it side to side. Torn rubber boots, visible grease leaking out, or any looseness confirms the part is failing. Run your hand along the strut shaft and bushings looking for cracks, tears, or separation from the metal collar.
- Check exhaust hangers and heat shields while the engine is cold. Grab the exhaust pipe near the hangers and push it in different directions. A clunk that reproduces here has nothing to do with the suspension. If the clunk shows up during braking specifically, also check for loose brake caliper hardware or worn pad clips.
A sequence of push, wheel-rock, and end-link probing reliably locates many suspension clunks before shop labor is required, and running through it in order keeps you from guessing at parts you haven’t actually confirmed are loose. If none of these tests reproduce the noise, a factory technical service bulletin search for your specific model and year can sometimes reveal a known issue with a documented fix, since manufacturers occasionally document model-specific clunk patterns and repair procedures that aren’t obvious from a visual inspection alone.
When a Suspension Knock Over Bumps Means Stop Driving
Not every clunk demands an immediate tow, but some absolutely do. The line between “drive carefully to a shop” and “call for a tow truck” comes down to whether the failure affects steering control or structural integrity.
Stop driving and arrange a tow if you notice:
- Steering that feels loose, wanders on its own, or requires constant correction
- A wheel that visibly leans in or out at the top compared to the others
- Sudden, severe vibration through the steering wheel or floor that wasn’t there before
- Any grinding or scraping sound accompanying the clunk
It’s generally safe to drive cautiously to a shop if:
- The clunk is isolated to bumps only, with no change in steering feel
- You’ve confirmed a loose heat shield or exhaust hanger through the probe test
- The noise comes from a sway bar end link with no accompanying steering play
Ignoring a worn component rarely keeps the problem contained to that one part. A failing bushing lets the control arm move outside its intended range, which puts additional load on the ball joint and strut mount that were never designed to absorb that extra motion. Replacing inexpensive, high-cycle parts like sway bar end links early often prevents accelerated wear on the more expensive structural components downstream, which is the practical argument for not letting a minor clunk go unaddressed for months.
Suspension Repair Cost Ranges to Expect
Cost depends heavily on which part failed and whether the failure is isolated or has already spread to neighboring components. Rough ranges below reflect parts and labor together, though your actual quote will vary by vehicle and shop labor rates.
A few variables push these numbers up or down. Vehicle model matters, since parts pricing for a Lexus differs from a Honda even when the failure is identical. OEM parts generally cost more than quality aftermarket equivalents, and labor rates vary by region and shop. Alignment is almost always recommended after any repair involving control arms, ball joints, or tie rod ends, and that typically adds a separate line item to the estimate.
Ask any shop for an itemized estimate that names the specific failed part rather than a vague “suspension repair” line. A shop willing to show you the worn bushing or the play in a ball joint before you authorize the work is giving you the kind of transparency that protects you from paying for parts that didn’t actually need replacing.
Preventing Suspension Clunks Before They Start
Most of the components covered here fail gradually, which means routine inspection catches them long before they turn into a clunk you can hear from the driver’s seat. At each scheduled service, ask your technician to check bushing condition, sway bar link boots, strut mount play, and overall shock and strut condition rather than waiting for a noise complaint to trigger a look.
A few habits extend the life of these parts meaningfully:
- Address oil or grease leaks near the suspension promptly, since petroleum products degrade rubber bushings and boots faster than normal wear would.
- Replace torn CV boots and sway bar link boots as soon as they’re spotted rather than waiting for the joint underneath to dry out and fail.
- Keep up with wheel alignments, since misalignment accelerates uneven wear on bushings, ball joints, and tie rod ends alike.
- If you live somewhere with heavy road salt use, rinse the undercarriage periodically, since corrosion attacks metal sleeves and fasteners long before rubber components show visible wear.
Pro Tip: Vehicles used regularly on gravel roads, in stop-and-go traffic with hard braking, or in regions with heavy winter salt tend to wear through sway bar end links and bushings faster than average. If that describes your driving, consider replacing these high-cycle parts proactively during a scheduled service rather than waiting for them to clunk.
What a Professional Suspension Inspection Involves
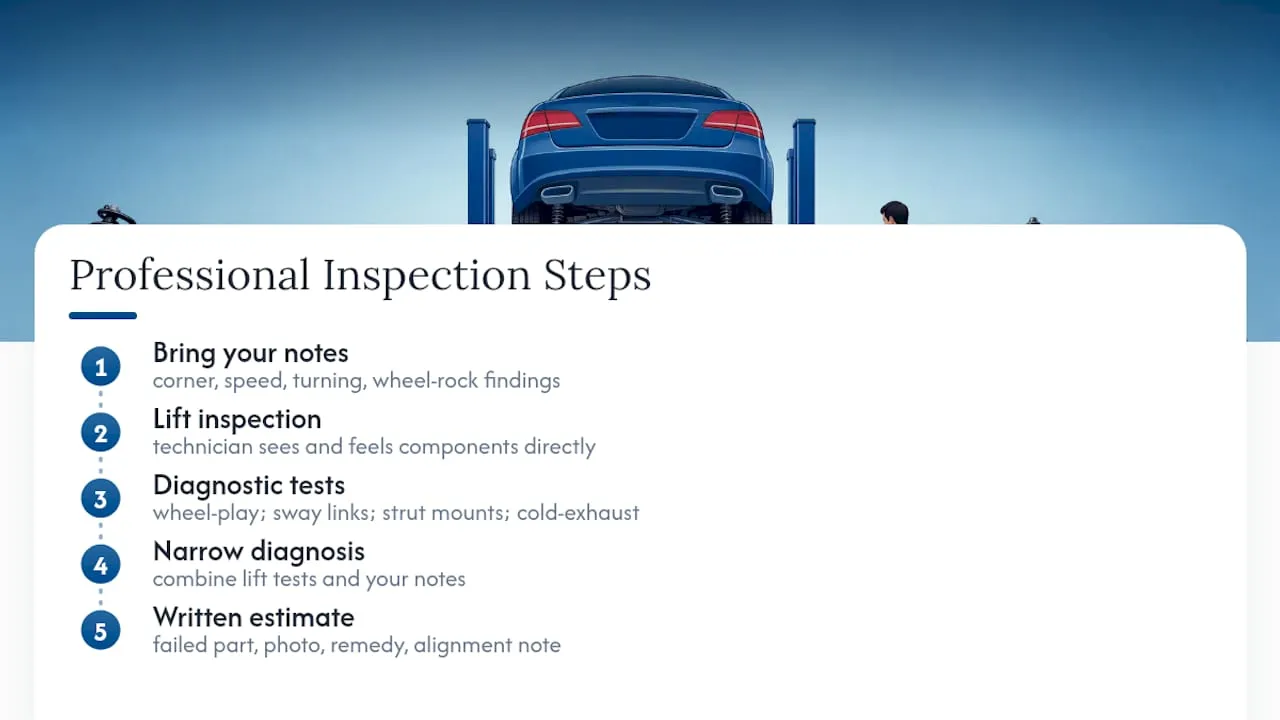
A shop visit for a suspension clunk typically starts with the same tests described above, performed on a lift where the technician can see and feel the components directly rather than guessing from ground level. That usually includes a wheel-play check with the tire off the ground, a hands-on inspection of sway bar link boots and bushings, a strut mount inspection under load, and a cold-exhaust probe to rule out heat shields and hangers before any suspension part gets condemned.
A useful written estimate names the specific failed part, ideally with a photo showing the wear, and states the recommended remedy along with whether an alignment is needed afterward. That level of detail is what separates a trustworthy quote from a guess. As independent specialists rather than a dealership, some shops focus on a few makes specifically, allowing technicians to see the same sway bar links, strut mounts, and control arm bushings repeatedly across similar models rather than across every make on the road.
Before your visit, bring whatever you found during your own inspection: which corner clunked, at what speed, whether turning made it worse, and any play you felt during a wheel rock test. That information, combined with a lift inspection, usually narrows the diagnosis fast rather than requiring hours of exploratory labor. Integrityautoinc’s complimentary vehicle inspection covers exactly this kind of suspension check, and the shop’s Toyota, Subaru, Honda, and Lexus service page outlines the full range of suspension and diagnostic work available. If your clunk turns out to involve a wheel-rock finding at the ball joint, Integrityautoinc’s ball joint page explains what that specific repair involves. Schedule an inspection to get a written, itemized answer instead of continuing to guess at the noise.
Sources
The diagnostic steps and cause rankings in this article draw on established automotive references worth reading in full. Popular Mechanics’ guide to suspension clunks and rattles covers push-and-release testing and technical service bulletin searches in more depth. EricTheCarGuy’s walkthrough on finding suspension noises demonstrates the wheel-rock and end-link probing tests on camera. Car Care Total’s breakdown of clunking causes ranks common failure points by frequency and cost. OTS Long Beach’s diagnostic guide offers a corner-by-corner approach to isolating the noise.
- How To Fix Car Suspension Clunks and Rattles | Popular Mechanics
- Finding suspension noises – EricTheCarGuy
- Clunking Noise Over Bumps: 7 Causes & How to Fix — Car Care Total
- Clunking Over Bumps: How to Find Which Part Is Loose
FAQ
Can I Drive With a Clunking Suspension?
It depends on the symptom. Driving cautiously to a shop is usually acceptable if the clunk is isolated to bumps with no steering change, but you should stop driving and arrange a tow if the steering feels loose, a wheel visibly leans, or you notice severe vibration.
How Much Does It Cost to Fix a Suspension Clunk?
Costs range from about $80 to $200 for a sway bar end link up to $300 to $700 per corner for a full strut assembly, with ball joints and control arm bushings falling in between depending on labor rates and whether an alignment is required afterward.
What Does Suspension Knocking Sound Like?
A sharp, metallic clunk usually points to a sway bar end link or ball joint, while a duller thud often indicates a strut mount or a worn shock hitting its internal travel limit. The sound typically changes depending on whether you’re driving straight, turning, or braking.
What Does a Failing Suspension Sound Like?
Beyond the clunk itself, a failing suspension often comes with secondary symptoms: clicking when turning slowly, a vague or wandering feeling in the steering, uneven tire wear, or a vehicle that continues bouncing for more than one cycle after hitting a bump. Any of these alongside a clunk is worth a hands-on inspection rather than waiting for the noise to get worse.