

P0456 means the EVAP system on your Toyota has detected a very small leak, typically at or near the 0.020-inch reference size used in Toyota’s factory test. It rarely causes a driveability problem, but it will keep the check engine light on and can fail an emissions test. Start by inspecting and tightening or replacing the gas cap, then scan for any other EVAP-related codes stored alongside it.
TL;DR:
- The P0456 code indicates a tiny leak within the EVAP system, usually at or near 0.020 inches, which often involves the gas cap or its sealing surface.
- Diagnosing this issue accurately requires a thorough smoke test and vacuum reference check, which can take several hours and should not be rushed with simple code clearing.
- The most common cause is a worn or improperly sealed gas cap, but issues with hoses, valves, or the charcoal canister can also trigger the code.
- Proper verification using Toyota Techstream is essential before replacing expensive components like the canister pump module to avoid unnecessary costs.
- Repair costs vary widely, from $15 for a gas cap to over $1,200 for a canister pump, with diagnostic work typically included in the overall estimate.
Table of Contents
- What Does P0456 Mean on a Toyota?
- Common Causes and Failure Modes Behind Toyota P0456
- How to Diagnose P0456 Step by Step
- Safe DIY Fixes and When to Call a Shop
- How Much Does It Cost to Fix a P0456 Code?
- What a Quality Repair Shop Does to Diagnose and Verify P0456
- Toyota P0456 Diagnostics and Repair at Integrity Auto
- Sources
- FAQ
What Does P0456 Mean on a Toyota?
P0456 sits in the “evaporative emission system, very small leak” category. The EVAP system is designed to trap fuel vapor from the tank and route it to the engine to be burned, rather than letting it vent into the atmosphere. When Toyota’s onboard computer runs its self-check and finds a leak smaller than a dime but big enough to matter for emissions compliance, it sets P0456 and turns on the check engine light.
The leak-size threshold that defines this code is roughly 0.020 inch, or about 0.5 millimeters. That is a genuinely tiny opening, smaller than the tip of a sewing needle in some cases, which explains why P0456 often shows up with no other symptoms at all. Compare that to P0455, which flags a large leak (think a missing gas cap or a disconnected hose) and you can see why P0456 tends to be the trickier one to hunt down.
Toyota’s factory diagnostic strategy for this code, called the Key-Off EVAP monitor, does not run while you are driving. It runs after the engine shuts off and the vehicle sits long enough to stabilize thermally, often for hours. The monitor works through a sequence:
- A reference check, where the system pulls a known vacuum through a calibrated orifice to establish what a 0.020-inch leak “looks like” electronically.
- A system leak check, where the same vacuum method is applied to the actual fuel tank and EVAP lines.
- A comparison phase, where the computer measures how quickly vacuum bleeds off in the real system versus the reference orifice.
- A purge and verification step, where the purge valve opens briefly to confirm normal operation before the monitor closes out as pass or fail.
This is why Toyota’s Key-Off monitor and reference vacuum system can take several hours of soak time to complete a full cycle, and why simply clearing the code and driving around the block almost never confirms a repair. A technician using Toyota Techstream can run an abbreviated version of this test, called the Evaporative System Check, which shortens the wait considerably. Without that tool, verifying a fix the old-fashioned way means letting the vehicle sit overnight and driving it under the right conditions before the monitor reports back.
Pro Tip: Fuel level matters more than most owners realize. The EVAP monitor is less likely to run correctly with very low or very high tank levels, so keeping the tank at an intermediate level can help the monitor complete.
Common Causes and Failure Modes Behind Toyota P0456
The gas cap is the single most common source of a P0456 code, and it is worth ruling out before anything else. A worn rubber O-ring, a cracked cap body, or a cap that simply is not threaded down tight enough will all let in enough air to trip the very-small-leak threshold. Replacing a damaged or improperly sealing gas cap resolves the code outright in a large share of cases, and it costs less than a fast-food combo meal.
Beyond the cap, the usual suspects fall into a handful of categories:
- EVAP hoses and lines. Rubber and plastic vapor lines run near the exhaust, suspension components, and body seams, where heat cycling and road debris eventually cause cracks, hardening, or pinholes. These often hide in spots you cannot see without getting the vehicle on a lift.
- Purge valve (purge VSV) and vent valve. These solenoids open and close to control vapor flow. A purge valve that leaks internally, or a vent valve that fails to seal fully closed, mimics a very small leak even when every hose is intact.
- Charcoal canister or canister pump module. The canister stores fuel vapor using activated carbon, and on many newer Toyota models the vacuum pump, vent valve, and reference orifice are combined into a single canister pump module. A worn diaphragm or a cracked housing inside that module can leak just enough to trigger P0456 without any outward sign of damage.
- Fuel tank top seals and sending unit gaskets. The fuel pump and sending unit assembly seals against the top of the tank with a gasket that can dry out or shift slightly over years of heat and fuel exposure, creating a leak path that is nearly impossible to spot visually.
- Filler neck sealing surface. Corrosion, road grime, or a slightly bent neck can prevent the gas cap from making full contact, which produces the same symptom as a bad cap even after you have installed a new one.
Because the canister pump module bundles several functions into one sealed unit, an internal failure in that assembly often means replacing the whole module rather than swapping a single cheap part. That is one reason a shop will usually test the module electrically and mechanically before recommending replacement, rather than guessing.
Some Toyota models have had documented canister or canister pump module issues addressed through manufacturer service bulletins. Checking for model-specific TSBs before buying a replacement part can save you from paying for a component that Toyota already identified as a recurring failure point on your particular model year.
Pro Tip: If your Toyota has thrown P0456 more than once after a cap replacement, look at where the filler neck meets the body. A slightly misaligned or corroded sealing lip will defeat even a brand-new cap, and no amount of cap swapping will fix it.
How to Diagnose P0456 Step by Step
Diagnosing P0456 correctly means working from the cheapest, most likely cause toward the more involved tests, rather than replacing parts on a guess. Skipping steps is how owners end up buying a canister pump module they never needed.
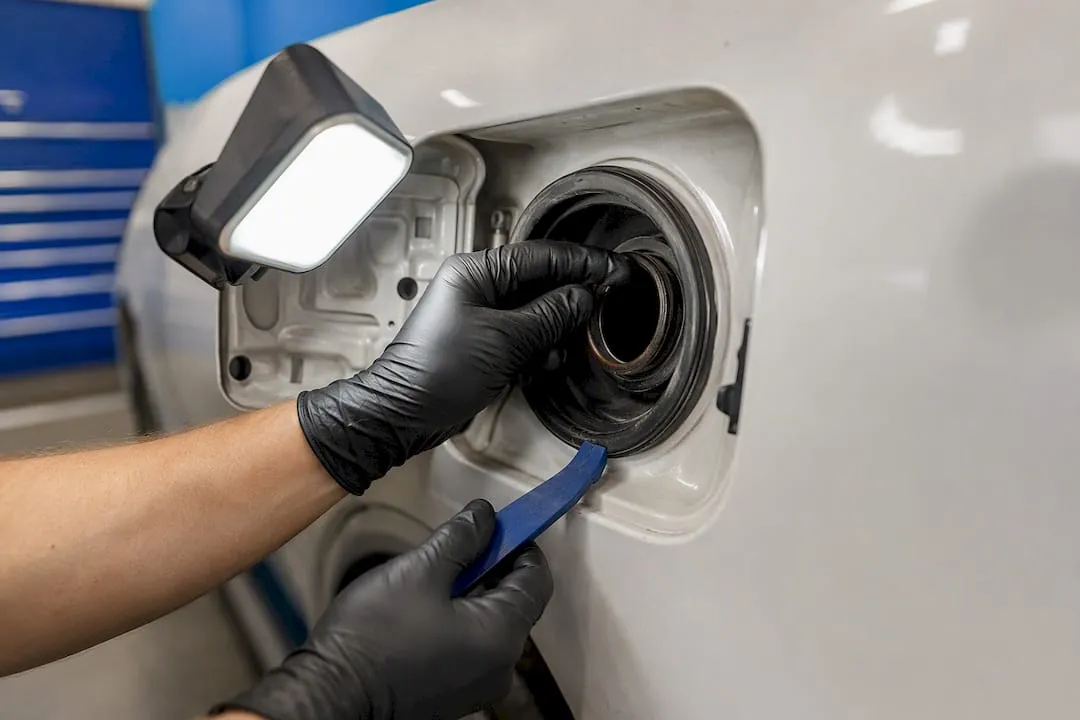
- Inspect and test the gas cap first. Remove the cap and look at the rubber gasket for cracks, flat spots, or debris. Reinstall it and listen for the correct number of audible clicks, since an undertightened cap is one of the most overlooked causes of this code. If the cap looks worn or the vehicle has more than 60,000 miles on the original cap, replace it with an OEM Toyota gas cap rather than a generic aftermarket unit, since sealing tolerances vary between manufacturers.
- Pull codes and review live EVAP data with a scan tool. A capable scan tool will show whether P0456 is alone or accompanied by related codes such as P0441 (purge flow) or P0446 (vent control). Reviewing freeze frame data tells you the fuel level, engine temperature, and driving conditions present when the code set, which helps confirm whether the monitor ran under valid conditions. If the freeze frame shows an unusually low or high fuel level, the monitor itself may have been the problem, not a real leak.
- Command the purge and vent valves with the scan tool. Bidirectional control lets you open and close each valve on demand while watching EVAP pressure data. If commanding the vent valve closed causes pressure to hold steady, the leak is likely downstream in the tank or canister side. If pressure will not hold no matter what you command, the leak path is broader and points toward hoses or a tank seal.
- Pressure test the cap and inspect the filler neck. A dedicated cap tester, often available at emissions testing stations, applies a small amount of pressure to confirm the cap holds a seal. Fuel cap testers at many emissions stations can settle the question in minutes; without one, a new OEM cap installed as a test is a reasonable low-cost substitute.
- Run a low-pressure smoke test. This is the step that actually finds hairline leaks that visual inspection misses. A smoke machine forces a visible vapor into the EVAP system at low pressure, typically 0.5 to 1.0 psi, and a technician watches for smoke escaping at hose fittings, the filler neck, or the canister. Staying under 1 psi matters, since exceeding that pressure risks damaging the diaphragms inside canister pump modules, turning a diagnostic step into an expensive mistake. Common leak points worth watching closely include the filler neck seam, the top of the fuel tank near the pump assembly, and any vapor line that runs close to the exhaust system.
Research on shop diagnostic practices backs this order up: visual inspection alone misses the majority of P0456 leaks, which is exactly why smoke testing and scan-tool valve commands exist as separate steps rather than substitutes for a careful look.
- Verify the repair with Toyota Techstream. Once a suspected leak is repaired, Toyota Techstream’s Evaporative System Check, and on many models a Cold Soak Bypass utility, let a shop run the manufacturer’s actual test logic on demand instead of waiting for a natural Key-Off cycle. This function can complete a verification pass in roughly 8 to 15 minutes in many cases, letting a shop confirm the fix before you ever leave the lot.
For readiness monitor purposes, keep in mind that a completed EVAP monitor after repair requires the right conditions. A repair verified by a false pass, or one where the monitor never actually completed, might cause the code to return later.
Pro Tip: After any EVAP repair, avoid clearing the code and driving once around the block to “see if it comes back.” The monitor needs a proper soak period and the right fuel level to run its full sequence, and clearing the code without letting the monitor complete just resets your wait time to zero.
Safe DIY Fixes and When to Call a Shop
Several parts of this diagnosis are well within reach for an owner with basic tools and a little patience. Others require equipment most driveways do not have, and pushing past that line usually means paying twice.
What you can reasonably do yourself:
- Clean the filler neck opening and the gas cap sealing surface with a rag, then inspect both for cracks, corrosion, or a warped cap that will not seat flush.
- Replace the gas cap with an OEM Toyota part if it shows any wear, since a mismatched aftermarket cap can look correct while sealing poorly.
- Visually inspect any EVAP hoses you can reach without lifting the vehicle, and replace ones that show cracking, hardening, or a loose clamp.
- Retorque hose clamps that look loose, particularly near the engine bay where heat cycling loosens fasteners over time.
What to leave alone unless you have shop-grade equipment: hidden vapor lines that run under the vehicle near the fuel tank, any work involving dropping or accessing the fuel tank itself, and diagnosis of the purge or vent valve wiring circuits. These require a lift, a scan tool with bidirectional controls, and in the tank’s case, fuel-system safety precautions that are not worth improvising.
A persistent P0456 that returns after a cap replacement, or any fuel odor you can smell from inside or near the vehicle, means it is time for professional diagnosis. A fuel smell in particular should not wait, since it can indicate a leak large enough to pose a real hazard rather than the very small leak this code is named for.
The most expensive mistake owners make with this code is chasing parts. Replacing a purge valve, then a vent valve, then eventually a canister pump module, hoping one of them fixes it, can run several hundred dollars in parts that get returned or discarded. A smoke test and a Techstream verification pass, done once, tend to cost far less than that trial-and-error approach and actually confirm where the leak lives before you buy anything.
How Much Does It Cost to Fix a P0456 Code?
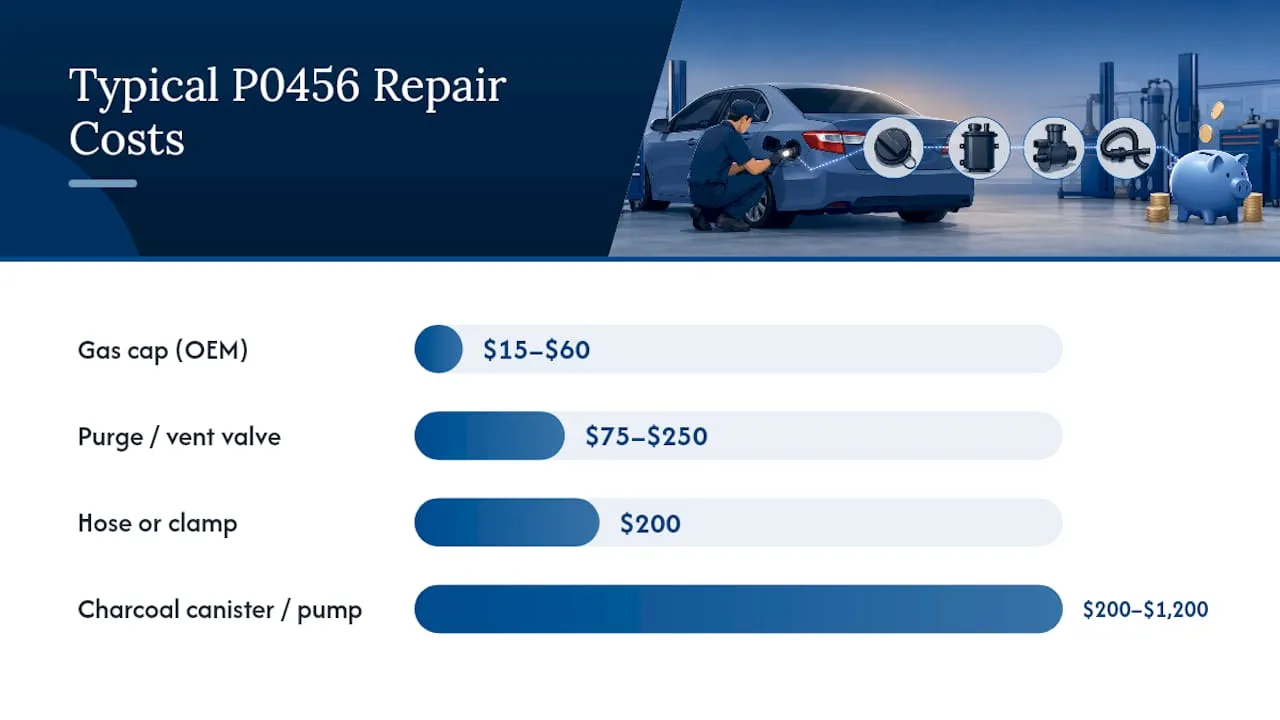
Repair costs for P0456 vary widely because the code can point to anything from a $20 part to a several-hundred-dollar module. Knowing the range helps you judge whether a shop estimate is reasonable for your specific cause.
| Repair | Typical Cost Range |
|---|---|
| Gas cap replacement (OEM) | $15 to $60 |
| Hose or clamp repair | $200 |
| Purge or vent valve replacement (parts and labor) | $75 to $250 |
| Charcoal canister or canister pump module (parts and labor) | $200 to $1,200 |
Diagnostic time is usually what separates a cheap fix from an expensive one, not the part itself. A shop performing a proper smoke test plus scan-tool verification typically charges a diagnostic fee separate from any repair, since isolating a 0.020-inch leak takes real bench time with a smoke machine and bidirectional scan tool. That diagnostic charge is money well spent, because it prevents the parts-chasing scenario described above.
Time estimates matter just as much as dollar figures. Even after a correct repair, proper verification requires several drive cycles with fuel level in the 35 to 75 percent range and stable ambient temperatures before the EVAP monitor will report complete. A shop using Techstream’s Cold Soak Bypass can shortcut that wait considerably, but a repair done without that tool may genuinely take a day or two of normal driving before you can trust the monitor’s readiness status, which matters directly if you are heading into a smog check.
What a Quality Repair Shop Does to Diagnose and Verify P0456
A shop that handles Toyota EVAP codes correctly follows a documented sequence rather than replacing parts based on the code alone. Knowing what that sequence looks like helps you judge whether an estimate reflects real diagnostic work.
The process typically includes:
- Running Toyota Techstream’s Evaporative System Check, and where supported, the Cold Soak Bypass utility, to get a direct read on system integrity rather than relying on a generic scan tool’s guess.
- Performing a low-pressure smoke test with UV dye and a bright inspection light, since dye residue left behind after the smoke dissipates helps pinpoint a pinhole leak that visual inspection alone would miss.
- Testing the purge valve, vent valve, and EVAP pressure sensor electrically and mechanically before recommending canister or canister pump module replacement, since those components are far more likely to fail than the canister itself.
- Documenting the verification step on the invoice, showing that the Techstream check passed after repair rather than simply noting that a part was replaced.
Pro Tip: Ask any shop quoting a canister or canister pump module replacement whether they smoke-tested the system first. If the answer is no, get a second opinion before authorizing several hundred dollars in parts for a problem that might be a $40 hose.
That last point is worth sitting with for a moment. A shop that skips the smoke test and jumps straight to canister replacement is treating a symptom-based code as if it names its own cause, which it does not. P0456 tells you a very small leak exists somewhere in the system. It does not tell you where, and only pressure testing and valve isolation actually answer that question.
Toyota P0456 Diagnostics and Repair at Integrity Auto
Integrity Auto diagnoses P0456 using the same manufacturer-level tools described above, including Toyota Techstream for Evaporative System Checks, low-pressure smoke testing to locate hairline leaks, and bidirectional scan-tool commands to isolate the purge and vent valve circuits before any part gets replaced. That diagnostics-first order matters because it is the difference between paying for a $200 hose repair and paying for a canister pump module you never needed.
As independent Toyota, Lexus, Subaru, and Honda specialists serving the Portland, Oregon area, Integrity Auto treats a P0456 diagnosis the way the factory procedure intends it, with soak time respected, verification completed before the car leaves the lot, and no guessing at parts. When you bring your Toyota in for a check engine light related to P0456, expect a clear diagnostic process: an initial fee to cover scan-tool data review and smoke testing, a written estimate once the leak location is confirmed, and repair authorization before any work begins. If the code is tied to an upcoming smog check, Integrity Auto’s emissions testing guidance can also help you time the repair and monitor readiness correctly.
If your check engine light is on and you suspect an EVAP leak, schedule your Toyota, Lexus, Subaru, or Honda service with Integrity Auto and get a verified diagnosis instead of a parts-replacement guess.
Sources
The diagnostic sequence and monitor logic described in this article draw on Toyota’s own service documentation for the Key-Off EVAP monitor, along with independent code-reference databases that catalog common causes and repair outcomes for P0456 across Toyota models. Readers who want to go deeper into the manufacturer test logic can review the Toyota Corolla EVAP service manual procedure, which lays out the reference vacuum and multi-phase test sequence in technical detail. General code definitions and typical failure rates for gas caps versus other components are cataloged at TroubleCodes.net, and practical smoke-test pressure limits and canister pump module details come from field-level repair writeups such as this breakdown of the code’s real-world causes. For readers tracking a broader check engine light concern beyond EVAP alone, Integrity Auto’s check engine light diagnostic overview covers the general diagnostic charge structure that applies to codes like this one.
- P0456 — 2010 Toyota Corolla L4-2.4L (2AZ-FE) Service Manual | Operation CHARM
- Troublecodes
- Toyota P0456: What That Check Engine Light Is Actually Telling You – Daily Car Tips
FAQ
How do I fix a P0456 EVAP code on my Toyota?
Start by inspecting and replacing the gas cap if it shows any wear, then scan for related codes and check live EVAP data. If the cap is not the cause, a low-pressure smoke test combined with Toyota Techstream verification will pinpoint the actual leak location before any parts get replaced.
Can I drive with a P0456 code?
Yes, a P0456 code by itself does not typically affect drivability or engine performance, since it reflects a leak in the vapor recovery system rather than the fuel delivery or ignition system. It will keep the check engine light on and can cause a failed emissions test, so it should not be ignored indefinitely.
How much does it cost to fix a P0456 code?
Costs range from around $15 to $60 for a gas cap replacement up to $200 to $1,200 for a charcoal canister or canister pump module, with purge and vent valve repairs typically falling between $75 and $250 including labor. Most shops also charge a separate diagnostic fee to cover scan-tool data review and smoke testing.
Can a loose gas cap cause a P0456 code?
Yes, a loose, cracked, or improperly sealing gas cap is one of the most common causes of P0456, and tightening or replacing the cap resolves the code in a large share of cases. If the code returns after a new cap is installed, the leak is likely elsewhere in the EVAP system and warrants a smoke test.


