


A repeated clicking sound when turning usually points to a worn outer CV joint, and a Honda making this noise should not be driven through sharp turns until it is checked. The most useful first step is a slow parking-lot turn test to confirm the pattern, followed by scheduling a diagnostic if the click is consistent. Catching it early keeps repair costs down and prevents a joint failure from damaging nearby components.
Table of Contents
- What the noise sounds like and when it occurs
- What causes these noises
- DIY parking-lot and road checks to narrow the cause before you visit a shop
- What shops do to isolate the failing part
- Repair options, cost ranges, and whether to DIY
- Maintenance and prevention to extend CV axle life
- Safety: is it drivable and when to stop driving
- Why trust this guide: Kelly and Integrity Auto’s diagnostic approach
- Differences in CV axle noise symptoms by Honda model/year
- Impact of driving conditions on CV axle wear and noise
- Typical lifespan of CV axles on Honda models
- How Integrity Auto can help: book a diagnostic or repair
- Sources
- FAQ
What the noise sounds like and when it occurs
CV axle problems tend to announce themselves through specific sounds tied to specific driving actions, and that pattern is the first clue to what is wrong. A failing CV joint typically produces a distinctive clicking, popping, or clunking sound most noticeable when accelerating while the steering is turned sharply, which is why the noise often shows up in parking lots and on tight corners rather than on the highway.
The timing and quality of the sound narrow down the likely cause:
- Clicking or popping during low-speed turns usually signals a worn outer CV joint.
- Clunking or popping on acceleration or from a stop often points to a worn inner joint or loose axle connection.
- Grinding or vibration at speed can mean a CV problem, but it also fits a failing wheel bearing or damaged suspension part.
- A noise that changes with braking or throttle input, rather than steering angle, suggests the issue may not be the axle at all.
Paying attention to when the sound happens, not just what it sounds like, gives a technician a real head start.
What causes these noises
CV joints and boots fail in fairly predictable ways, and understanding the mechanics explains why the symptoms line up the way they do.
- Outer CV joint wear shows up as clicking during turns because that joint handles the steering angle and carries more repetitive stress.
- Inner CV joint wear tends to produce clunking under acceleration or load, since it manages the plunge motion as the suspension moves.
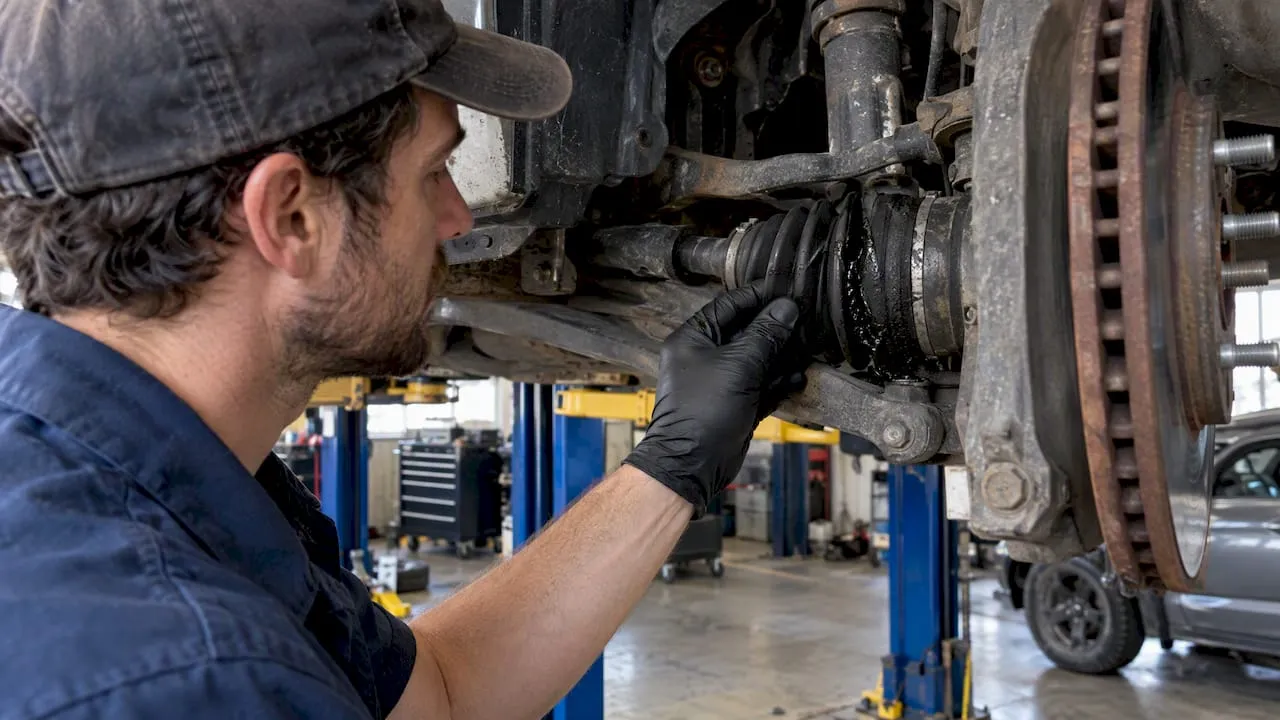
- A torn CV boot lets grease escape and dirt enter, and once that happens, wear accelerates quickly. A torn boot with grease leakage is an early, fixable condition, but once the joint runs dry and develops metal-to-metal wear, a joint-only or full-axle replacement is usually required.
- A bent axle or damaged axle end can create vibration or clunking that mimics joint wear but requires a different fix.
Not every front-end noise is a CV problem. Worn wheel bearings, sticking brake calipers, and loose steering or suspension components can produce similar sounds, which is one reason professional diagnosis matters before parts get replaced.
DIY parking-lot and road checks to narrow the cause before you visit a shop
Before booking a diagnostic, a few simple checks at low risk can help pinpoint what is happening and give a technician useful starting information.
- Reproduce the click. Drive slowly in a large parking lot and turn the wheel fully left, then fully right, while accelerating gently. This is the same basic logic behind the parking-lot and visual checks many owners use before a shop visit.
- Test with braking. Note whether light braking changes or quiets the noise, since a noise that responds to braking is less likely to be CV-related.
- Compare speed versus steering angle. A noise that scales with road speed rather than steering angle points more toward a wheel bearing or tire issue.
- Inspect visually. With the vehicle safely parked and the wheel turned, look for a torn boot, slung grease, or visible play at the axle, but only check under the car with proper jack stands, never a jack alone.
Pro Tip: Write down the exact speed, steering angle, and throttle or brake state when the noise happens. That detail, not the sound itself, shortens diagnosis time and lowers diagnostic charges.
Stop driving immediately if the noise is joined by a clunk during gear changes, a visible wobble in the wheel, or a sudden loss of power to that wheel.
What shops do to isolate the failing part
When a test drive does not clearly identify which side is making the noise, shops turn to a more controlled method rather than guessing. When a test drive cannot clearly identify the side making a clicking noise, lift-and-rotate tests are used to isolate the failing joint and avoid replacing the wrong axle assembly, a method built into Honda’s own service guidance.
The process generally includes:
- Lifting the vehicle so both front wheels can be rotated independently by hand.
- Manipulating the steering angle while rotating each wheel to reproduce the clicking sound and confirm which side it comes from.
- Checking boot condition and grease pattern for tears, cracking, or slung grease that confirms the failure point.
- Deciding between joint-only repair and full-axle replacement based on how far the wear has progressed.
Isolating the correct side before replacement matters because professional diagnoses reduce the risk of unnecessary axle replacement by isolating the failing joint with controlled bench tests, which avoids paying for a part that was never the problem.
Repair options, cost ranges, and whether to DIY
The right fix depends on how far the wear has progressed, and the options range from a simple boot repair to a full axle swap.
- Boot repair or repack works when the boot is torn but the joint itself still has clean grease and no metal-to-metal wear; it is the cheapest fix but only viable if caught early.
- Joint-only replacement suits cases where one joint has failed but the rest of the axle is sound, though labor to disassemble and reseal the joint can approach the cost of a new axle.
- Whole-axle replacement is the more common shop choice once a joint has run dry, since reman and new axle assemblies are widely available and often faster to install than rebuilding one joint.
- Labor time, vehicle model, and whether both sides need attention are the main factors that push the total cost up or down.
DIY replacement is possible with the right tools, including a torque wrench, axle nut socket, and a way to safely support the vehicle, but it requires care around torque specs and boot clamp installation. A shop job typically carries a parts and labor warranty that a DIY repair does not.
Maintenance and prevention to extend CV axle life
A few habits go a long way toward avoiding premature CV axle failure.
- Inspect the CV boots during every oil change or at least twice a year, checking for cracks, tears, or grease residue around the boot.
- Avoid repeated sharp, full-lock turns at low speed when possible, since this maneuver stresses the outer joint more than normal driving.
- Repair a torn boot as soon as it is found, since a few dollars of boot repair now can prevent a joint replacement later.
- Follow routine inspection items listed in the Honda Maintenance Minder system, which includes driveshaft boot checks at scheduled service intervals.
Pro Tip: A torn boot caught during a routine inspection is often a same-day fix. A torn boot caught after the joint has run dry rarely is.
Safety: is it drivable and when to stop driving
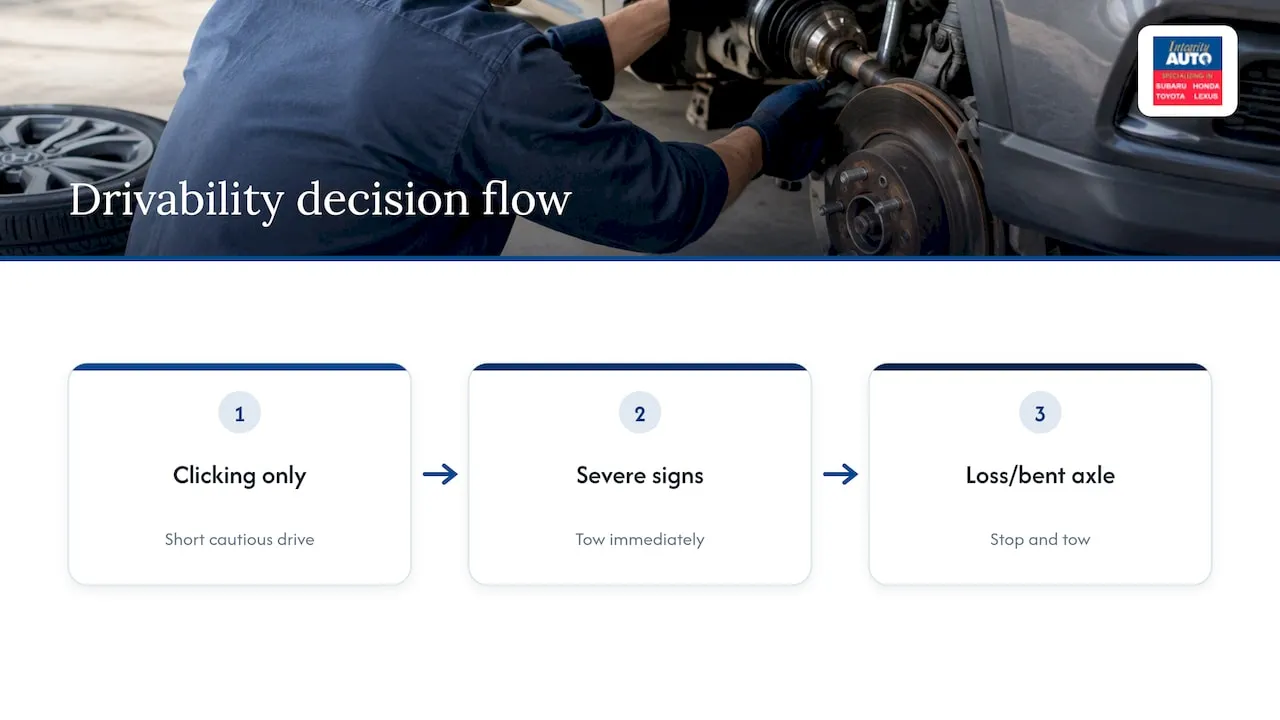
A clicking noise that only shows up during tight, low-speed turns is often tolerable for a short drive to a shop, though it should not be ignored for long. A loud clunk, a noticeable wobble in the wheel, or a grinding sound at speed is a different situation and warrants towing rather than driving. Stop immediately if the vehicle loses drive to a wheel or the axle appears visibly bent or loose, and if driving to a shop is unavoidable, keep speeds low and avoid sharp turns along the way.
Why trust this guide: Kelly and Integrity Auto’s diagnostic approach
This guide draws on Integrity Auto Inc.’s day-to-day work diagnosing Honda CV axle and joint noise, including the lift-and-rotate isolation method described above. The shop’s Honda Services & Repair page outlines its diagnostic and repair offerings, and its diagnostic process page explains what a diagnostic visit typically involves. The shop’s own CV axle noise resource covers the same parking-lot tests described earlier in more detail.
Differences in CV axle noise symptoms by Honda model/year
CV axle noise follows the same basic mechanical pattern across Honda’s lineup, but a few practical differences show up between models. Front-wheel-drive Hondas, including the Civic, Accord, and CR-V, place more load on the outer CV joints during turns because the front axles also steer the vehicle, which is why clicking during turns is the most commonly reported symptom on these models. All-wheel-drive Hondas, such as certain CR-V and Pilot trims, add a rear axle set that can develop its own clicking or clunking, sometimes making the noise harder to pin to one axle without a lift-and-rotate check.
Older Honda models with higher mileage are more likely to show grease-related boot failures simply because the rubber has had more years to crack and harden, while newer models under warranty more often show noise from a damaged boot after contact with road debris rather than age-related wear. Minivans and larger SUVs in the lineup, which carry more weight and see more full-lock turns in parking situations, tend to stress the outer joints faster than sedans.
None of these differences change the diagnostic approach. A consistent click during turns still points to the outer joint regardless of model, and a shop performing a lift-and-rotate test can isolate the failing side and joint the same way on any Honda in the lineup.
Impact of driving conditions on CV axle wear and noise
Driving habits and road conditions have a direct effect on how long CV axles last before they start clicking or clunking. Frequent sharp turns at low speed, common in tight parking garages or repeated three-point turns, place extra strain on the outer joint’s range of motion and can accelerate wear over time. Rough or unpaved roads increase the risk of a rock or debris puncturing a CV boot, which starts the failure clock the moment grease begins to leak out.
Climates with harsh winters or heavy road salt use add another stress factor, since salt and grit can work into a cracked boot faster than in drier conditions and speed up corrosion on the axle shaft itself. Stop-and-go city driving with constant steering input during parking maneuvers tends to wear outer joints faster than steady highway commuting, where the wheels spend most of their time pointed straight ahead.
Towing, carrying heavy loads, or driving with worn suspension components can also increase axle stress indirectly, since a sagging or misaligned suspension changes the angle at which the CV joint operates. None of these factors guarantee failure, but they explain why two Hondas of the same age and mileage can have very different axle conditions depending on where and how they were driven.
Typical lifespan of CV axles on Honda models
CV axles are built to last the life of the vehicle under normal conditions, and a torn boot or worn joint is typically a sign of damage or aging rubber rather than a scheduled wear item like brake pads. How long a given axle lasts depends heavily on driving conditions, road debris exposure, and how quickly a torn boot gets caught and repaired.
A boot that tears and goes unnoticed shortens the axle’s effective life significantly, since grease loss and contamination can turn a simple boot fix into a full joint failure within a relatively short period of continued driving. Regular inspection is the main variable an owner can control, since catching a torn boot early and repairing it keeps the joint running in clean grease indefinitely longer than one left exposed to dirt and moisture.
Because so much depends on conditions rather than a fixed mileage number, the most reliable guidance is behavioral: inspect the boots at every service interval, address damage immediately, and treat any new clicking or clunking as a signal to check rather than ignore.
How Integrity Auto can help: book a diagnostic or repair
Integrity Auto Inc. diagnoses Honda CV axle noise using the same lift-and-rotate approach described above, isolating the failing side before recommending a repair rather than guessing from a test drive alone.
- Bring notes on when the noise happens, including speed, steering angle, and whether braking changes it.
- Expect a lift-and-rotate check along with a visual inspection of the boots and grease condition.
- Ask about parts and labor warranty coverage before work begins.
| What you get | Detail |
|---|---|
| Diagnostic visit | Structured lift-and-rotate isolation test |
| Repair scope | Boot repair, joint replacement, or full axle depending on wear |
| Vehicle coverage | Honda Services & Repair, plus Toyota, Lexus, and Subaru |
Book a Honda diagnostic and repair visit or review the diagnostic charges and process before scheduling.
Sources
Readers who want more detail on isolating CV joint noise can review the Honda OEM guidance on lift-and-rotate testing, AAA’s advice on diagnosing vehicle noises, and a partner guide on diagnostic methods for isolating a bad CV joint.
- Four Symptoms of a Bad CV Joint — RealTruck
- Vehicle noises you should never ignore — AAA Club Alliance
- Clunking, popping or clicking while turning — Honda OEM DTC
- How to tell if your CV axles are going bad — AutoZone
FAQ
What noise does a failing CV axle make?
A failing CV axle most often produces a clicking or popping sound during turns, especially at low speed and under acceleration. The sound is most noticeable when accelerating while the steering is turned sharply, and it can progress to a clunk as wear increases.
Can I drive if my CV axle is making noise?
A mild click during turns is often tolerable for a short drive to a shop, but it should not be ignored for long. A loud clunk, visible wobble, or grinding noise means the vehicle should be towed rather than driven, since continued driving in that state raises the risk of a sudden loss of drive.
How long will a CV axle last once it starts making noise?
There is no fixed timeline once clicking or clunking begins, since it depends on how far the joint has worn and how quickly the boot lost grease. Addressing it promptly, rather than waiting, is what keeps a simple boot repair from turning into a full joint or axle replacement.
What can be mistaken for a bad CV axle?
Worn wheel bearings, damaged suspension components, and certain brake issues can all produce sounds similar to a CV joint click or clunk. Not all unusual front-end noises are CV-related, which is why a controlled shop test is used to isolate the actual source before any parts are replaced.


