

Even, uniform wear across both inner and outer pads is normal and means the braking system is functioning correctly. Tapered, one-sided, or grooved wear almost always points to a mechanical fault, such as a sticking caliper or seized slide pin, not a defective pad. The threshold that matters most is thickness: replace pads at about 3 mm remaining, and treat 2 mm as an absolute floor before metal-to-metal contact starts damaging rotors.
TL;DR:
- Uneven wear patterns, such as tapered, grooved, or one-sided wear, typically indicate mechanical faults like stuck calipers or seized pins, not defective pads.
- Pads should be replaced when their thickness reaches about 3 mm, with 2 mm serving as an absolute minimum before metal-on-metal contact damages the rotor.
- Visual inspection through the wheel, combined with measurements using a caliper or wear tabs, helps accurately determine remaining pad thickness and condition.
- Drivers should inspect brake pads regularly, especially in heavy traffic or towing situations, and avoid driving if grinding noise or uneven wear signs appear.
- Proper maintenance of hardware and driving habits can significantly extend pad life, which generally ranges from 30,000 to 70,000 miles depending on use and material.
Table of Contents
- Brake Pad Wear Patterns: A Visual Diagnostic Chart
- What Causes Uneven Brake Pad Wear?
- How to Inspect and Measure Brake Pad Thickness
- Driving Habits and Pad Materials That Affect Wear
- When to Stop Driving and Call a Shop
- Get a Brake Inspection From Integrity Auto
- Sources
- FAQ
Brake Pad Wear Patterns: A Visual Diagnostic Chart
Brake pad wear patterns fall into a handful of recognizable categories, and learning to spot them from a quick glance through the wheel spokes tells you far more than a stopping-distance guess ever could. A normal, healthy brake pad wear pattern shows even thickness on both the inner and outer pad with a smooth friction surface, free of grooves, cracks, or excessive taper. Everything else on this list deserves a closer look.
- Normal/even wear: Inner and outer pads match in thickness and the surface looks uniform and matte, not shiny.
- Tapered wear: One edge of the pad, top to bottom or side to side, is noticeably thinner than the other, forming a wedge shape.
- Inboard vs. outboard wear: The inner pad wears faster than the outer pad (or vice versa) on the same caliper.
- One-pad-only wear: Only the inner or outer pad shows significant wear while its partner looks nearly new.
- Grooves or embedded debris: Visible scratches or channels cut into the friction surface, often paired with a rotor that feels rough to the touch.
- Glazing: A shiny, glass-like, hardened surface that has lost its texture and its grip.
- Cracked, chipped, or stepped lining: Visible fractures, missing chunks, or a ledge where the lining has worn unevenly across its face.
- Rivet or backing-plate exposure: Metal rivets or the bare backing plate touching the rotor, which is not a wear pattern so much as a failure already in progress.
Debris embedded in the pad surface deserves particular attention, since dust and grit trapped between pad and rotor accelerate wear on both parts. Shops that specialize in brake dust removal note that contamination left on the friction surface can score a rotor in a matter of weeks under heavy stop-and-go driving.
What Causes Uneven Brake Pad Wear?
Every abnormal pattern above traces back to a specific mechanical cause, and matching the two correctly saves you from replacing pads twice for the same underlying problem. Tapered wear often points to worn caliper bushings or defective mounting hardware that lets the caliper sit crooked against the rotor. One-pad-only wear typically means a seized caliper piston or a sticking slide pin is preventing that pad from retracting fully between stops.
Grooves usually mean the rotor itself has scoring or embedded debris transferring damage back into the new pad, so replacing pads alone will not fix it. Glazing and cracked lining come from overheating, caused by repeated hard braking, a dragging caliper, or a collapsed brake hose acting like a one-way valve that traps pressure and keeps the pad pressed against the rotor. A step or ledge in the lining, or exposed rivets, almost always means the pad was installed incorrectly or was left in service far too long, and it calls for immediate replacement.
- Compare pad thickness side to side across the same axle, not just front to back.
- Spin the wheel by hand with the brake released and listen for drag or scraping.
- Check for fluid weeping around the caliper boot, a sign of a failing seal.
- Push on the caliper by hand (car safely supported) to confirm it floats freely on its slides.
Pro Tip: If one front wheel’s pads are visibly thinner than the other, don’t just swap in new pads. Have the caliper slide pins on that side cleaned and lubricated first, or you’ll be back to uneven wear within a few thousand miles.
How to Inspect and Measure Brake Pad Thickness
A visual check through the wheel spokes catches obvious problems, but pulling the wheel gives you a clear view of both the inner and outer pad, which matters since they wear at different rates on many vehicles. Once the wheel is off, three methods work: eyeball it against a ruler, use a caliper tool for an exact reading, or rely on the built-in mechanical wear tab.
- Visual check: Look through the spokes at the outer pad, then remove the wheel to inspect the inner pad the same way.
- Ruler or gauge measurement: Measure the remaining friction material thickness, not including the metal backing plate.
- Wear indicator check: Note whether the metal tab is close to, or already touching, the rotor surface.
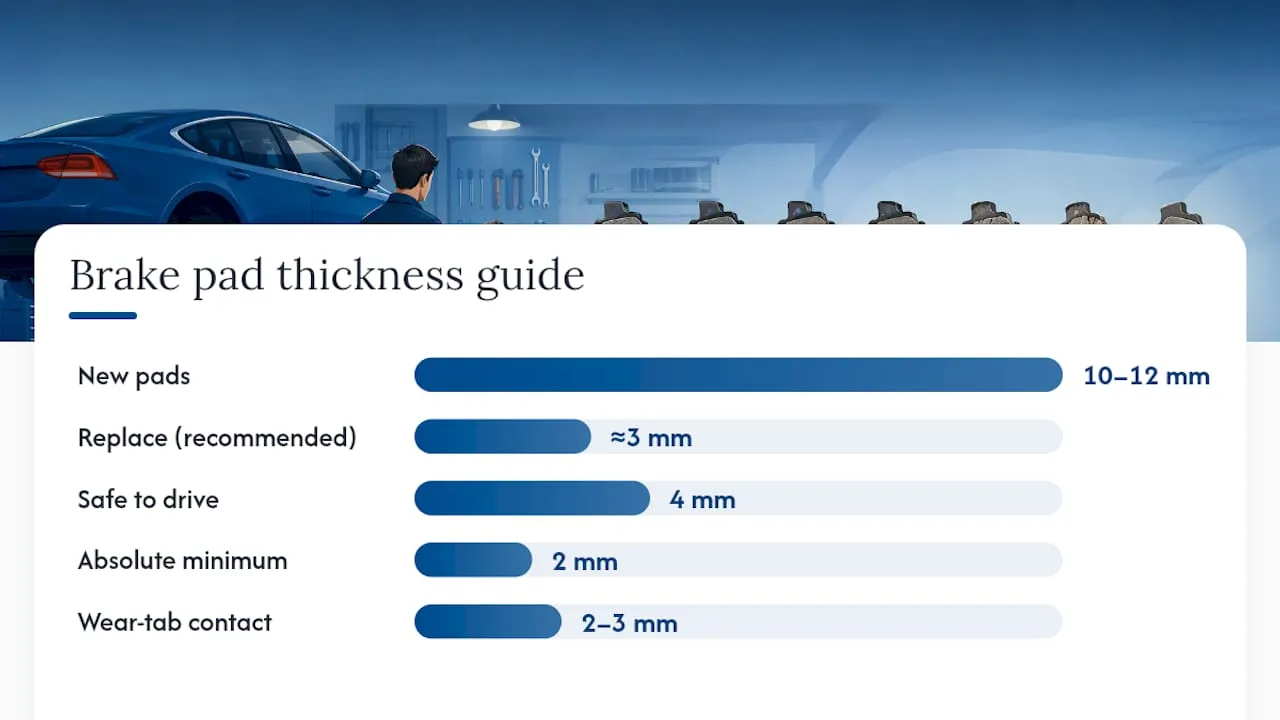
New pads typically start at 10 to 12 mm of friction material. Most mechanics recommend replacing brake pads at around 3 mm remaining, which leaves a safety margin before metal contacts the rotor. Four millimeters is still safe to drive on, but it means a replacement should go on the calendar soon rather than later. Two millimeters is the absolute minimum; beyond that point, metal-on-metal contact can score or warp the rotor, turning a pad job into a pad-and-rotor job.
Mechanical wear indicators are metal burrs designed to contact the rotor at roughly 2 to 3 mm and produce a high-pitched squeal on purpose. That squeal only sounds while braking, though, and can be intermittent, so it should never replace a manual check. Electronic sensors carry the same limitation, and on many vehicles they monitor only one pad per wheel, missing the kind of one-sided wear covered above. If the rotor itself shows deep grooves, measurable warpage, or thickness near its stamped minimum, it needs resurfacing or replacement alongside the pads, not after them. Full guidance on when to replace brake pads covers the DIY checklist in more detail.
Driving Habits and Pad Materials That Affect Wear
Front pads wear faster than rear pads on nearly every vehicle, since the front brakes handle most of the stopping force during a typical deceleration. Pad lifespan varies widely, roughly 30,000 to 70,000 miles depending on driving style, vehicle weight, and pad material, so two owners of the same model can see very different results.
- Driving habits: Anticipating stops, coasting down to red lights, and using engine braking on long grades all reduce heat buildup and stretch pad life.
- Organic pads: Softer and quieter, but they wear faster and need more frequent replacement.
- Semi-metallic pads: More durable under heat, though they tend to wear rotors faster than organic or ceramic compounds.
- Ceramic pads: Quieter and longer lasting, generally at a higher upfront cost.
- Maintenance: Lubricating slide pins, replacing worn hardware, and flushing contaminated brake fluid all prevent the sticking that causes uneven wear.
Check pad thickness at every tire rotation or oil change, and inspect more often if you tow, haul heavy loads, or drive mostly in stop-and-go city traffic.
When to Stop Driving and Call a Shop
Grinding noise, visible backing-plate contact with the rotor, the car pulling hard to one side under braking, or a soft and sinking pedal all mean the vehicle should not be driven further until it is inspected. These are the same warning signs of worn brake pads that show up as reduced stopping power and longer stopping distances well before a full failure.
A proper professional inspection should cover more than just pad thickness:
- Pad thickness on both the inner and outer pad, measured directly.
- Caliper piston and slide pin movement, checked by hand.
- Rotor runout and thickness against the manufacturer’s minimum spec.
- Brake hose condition, since a collapsed hose mimics a stuck caliper.
- Brake fluid condition and any signs of leaking at the calipers or lines.
The likely outcome ranges from a straightforward pad swap to pad-and-rotor service, or caliper and hardware repair if the wear pattern points there. Ask the shop to show you the actual wear pattern on the old pads, explain what caused it, and break down parts versus labor before authorizing the repair. New pads that squeak shortly after installation are worth a quick follow-up too; that behavior and its causes are covered separately in why brakes squeak after new pads and rotors.
Get a Brake Inspection From Integrity Auto
Brake inspections, pad and rotor replacement, and caliper and hardware repair for Toyota, Lexus, Subaru, and Honda vehicles are available, typically provided by technicians certified by industry standards and using OEM parts.
If you have already spotted an uneven wear pattern, whether tapered, one-sided, or grooved, bringing that observation to the shop speeds up the diagnosis considerably. A technician can confirm whether the cause is a caliper, a slide pin, or a rotor issue rather than guessing from scratch. Schedule a Toyota brake inspection or explore Lexus service and repair, Honda brake service, or Subaru brake repair to get pad thickness measured and hardware checked before a pattern turns into a rotor replacement. For a diagnostic-only visit, the diagnosis and estimate page outlines what to expect.
Sources
This guide draws on wear-pattern references from NRS Brakes for mapping patterns to mechanical causes, Haynes for measurement method and wear-tab behavior, VehicleBar for replacement thresholds, Family Handyman for glazing identification, and RAC Drive for typical pad lifespan ranges.
- Don’t throw them out yet — how to read brake pad wear patterns to diagnose problems | NRS Brakes
- Brake pad thickness guide: Minimums, measurements & when to replace | VehicleBar
- How to check the thickness of your brake pads | Haynes
FAQ
What Is a Normal Wear Pattern for Brake Pads?
A normal pattern shows even thickness across the inner and outer pad with a smooth, matte friction surface and no grooves, cracks, or heavy taper. Any noticeable difference in thickness between the two pads on the same wheel, or between the two front wheels, suggests a mechanical issue rather than routine wear.
What Are the Signs of Worn Brake Pads?
Common signs include a high-pitched squeal from the wear indicator, reduced stopping power, longer stopping distances, the car pulling to one side, and vibration or pulsation felt through the brake pedal. Grinding is a later-stage sign and means the pad has likely worn down to the metal backing.
What Percentage of Brake Pad Wear Is Acceptable?
There is no official percentage, but thickness is the standard measure. New pads run about 10 to 12 mm, and replacement is recommended around 3 mm remaining, leaving margin before metal contacts the rotor.
Is 4 mm Left on Brake Pads OK?
Four millimeters is still within a safe operating range for most vehicles, but it is close enough to the 3 mm replacement point that scheduling service soon is the sensible move. Waiting until the pad reaches 2 mm, the absolute minimum, raises the risk of rotor damage and a more expensive repair.


