

Do not test a vehicle while the check engine light is on. Scan the car first, repair any stored codes, and give the engine time to complete its drive cycles so the readiness monitors can reset before heading to the test lane. Most cars built in 1996 or later use OBD-based testing, and the printed test report or a technician’s scan is what points to the exact repair needed for a clean retest.
TL;DR:
- OBD test reports show stored trouble codes, malfunction light status, and each monitor’s readiness, helping technicians target the catalyst, fuel vapor, or ignition system.
- After a battery disconnect, code clearing, or repair, monitors may take a local drive or several days of commuting, often with steady highway driving.
- Do not clear codes or disconnect the battery to extinguish the warning; unresolved faults return, and reset monitors can trigger another rejection.
- In Portland, testing costs $25 only after a pass, while failed attempts are free; the resulting certificate remains valid for 180 days.
- Fuel additives may help minor carbon buildup over time, but they cannot repair a failed converter, faulty oxygen sensor, or cracked vapor hose.
What an Emissions Test Checks: OBD Versus Tailpipe
An OBD-based test connects a scan tool to the vehicle’s data link connector and checks three things: whether the check engine light (MIL) is commanded on, whether any emissions-related diagnostic trouble codes are stored, and whether the readiness monitors have finished their self-checks. This applies to most 1996 and newer vehicles. Older cars without OBD systems may be checked using other emissions-testing methods.
The printout from an OBD test lists specific monitors by name, and knowing them helps you understand what a technician is actually chasing:
- Misfire monitor: flags irregular combustion events that raise hydrocarbon emissions.
- Catalyst monitor: checks whether the catalytic converter is reducing pollutants as designed.
- Evap monitor: tests the fuel vapor containment system, often triggered by a loose gas cap.
- O2 sensor monitor: confirms the oxygen sensors are reporting accurately to the engine computer.
- DLC/communication check: verifies the data link connector is accessible and communicating properly with the scan tool.
Quick Pre-Test Maintenance Checklist You Can Do or Schedule at a Shop
A short list of maintenance checks before your appointment can prevent a wasted trip to the testing station.
- Confirm the check engine light is off. If it’s on, scan for stored codes rather than disconnecting the battery or clearing the light, since an unresolved fault will resurface and the readiness monitors will reset to incomplete.
- Replace a dirty air filter and check that the engine oil isn’t overdue, since both affect combustion efficiency and tailpipe output.
- Inspect spark plugs and related ignition components on vehicles where misfires have been a concern.
- Check that the gas cap seals tightly and shows no cracking, since a loose or damaged cap is a common evap system trigger.
- Look underneath for visible exhaust leaks or heavy smoke from the tailpipe, and address either before testing.
Pro Tip: If you’re not sure whether a dash warning is emissions-related, a quick scan at a repair shop is faster and cheaper than guessing and failing the test.
If the Check Engine Light Is on or You Have Stored Codes: What to Do Next
A lit MIL during an OBD test is nearly always an automatic fail, and clearing the codes without fixing the underlying issue only masks the problem temporarily. The computer will log the fault again once driving conditions trigger the same monitor, and the readiness status will reset to incomplete in the process.
The more productive path is:
- Pull the stored diagnostic trouble codes and any freeze-frame data with a scan tool before any repair work begins.
- Bring that information to a technician so repairs target the actual failing component rather than guesswork.
- Ask the shop to confirm which specific monitor, such as catalyst or evap, needs to complete before you return for a retest.
This approach avoids the common cycle of clearing a code, driving to the test station, and getting rejected again for an incomplete monitor. Our check engine light diagnosis guide walks through how a technician narrows down the cause before repair begins.
Drive Cycles and Readiness Monitors: How to Avoid an ‘Unready’ Result
An ‘Unready’ result means the onboard computer hasn’t finished running its internal self-checks on one or more emissions subsystems, and it’s one of the most common reasons a test gets rejected. A recent battery disconnect, a cleared code, or a recent repair all reset the monitors to incomplete, and they have to run through a specific driving pattern to set again.
Drive cycles vary by manufacturer, and completing one often requires a mix of highway and stop-and-go driving, sometimes with idle periods and engine cool-downs built in. A few practical points:
- Expect the process to take anywhere from a short local drive to several days of normal commuting, depending on which monitor is incomplete and how the manufacturer designed its cycle.
- Highway driving at a steady speed tends to complete more monitors than city driving alone.
- A repair shop with the right scan tool can often verify which monitors remain incomplete and advise the fastest path to readiness instead of leaving you to guess through repeated short trips.
Pro Tip: If a monitor won’t set after regular driving, ask a shop to check for a related fault code rather than continuing to drive and hope.
For Portland-area drivers dealing with a stubborn ‘Unready’ status, our guide to DEQ monitor rules and fixes breaks down what typically causes the delay.
What to Do if Your Car Fails: Reading the Report, Repairs, and Retest
A failed test isn’t the end of the process. The report itself is the roadmap for the repair.
- Read the printed report carefully. It lists which diagnostic trouble codes triggered the failure and which monitors were incomplete, pointing to the specific subsystem at fault, whether that’s the catalyst, evap system, or a misfire.
- Take that printout to a repair facility and ask for diagnostics tied directly to the codes shown, rather than a general inspection.
- Once repairs are complete, allow the vehicle to complete its drive cycle before returning for a retest, since testing too soon after a repair often produces another ‘Unready’ result.
- Understand the retest policy for your testing program; many programs only charge the fee when a passing certificate is issued, and some offer cost-based waivers for owners who’ve made a documented repair investment but still can’t pass.
Day-of Testing Checklist: Paperwork, Warm-Up, and Avoiding Rejections
A short list of final checks before you drive to the testing station can prevent an avoidable rejection; following safe engine bay cleaning practices can also help prepare your vehicle.
- Bring your registration renewal notice and an accepted form of payment.
- Keep any recent repair receipts on hand in case you’re applying for a waiver or need to show proof of work done.
- Drive the vehicle normally for a reasonable distance beforehand to bring the engine to full operating temperature.
- Confirm the check engine light is off and that there’s no heavy smoke from the tailpipe.
- Avoid testing immediately after clearing a code or disconnecting the battery. Verify the readiness monitors have had time to complete first.
Typical Test Timing and Fee Notes
Testing programs vary by state and county, so it’s worth checking your local DEQ or equivalent agency for exact scheduling and payment details. In the Portland, Oregon area, the vehicle testing fee is $25, and that fee is only charged once the vehicle passes and receives a Certificate of Compliance. There’s no charge for a failed attempt, which removes some of the pressure around a first failed result.
A passing result typically comes with a certificate valid for 180 days, which matters when timing a registration renewal or a sale. Testing stations in the Portland area also list acceptable payment methods and note that vehicles producing excessive visible smoke may be refused a test outright for safety reasons.
Scheduling ahead rather than waiting until the registration deadline gives you room to handle a failed test and retest without a late fee. If a repair is needed, allowing a few days between the fix and the retest also gives the readiness monitors time to complete, which avoids a second wasted trip to the station.
How to Interpret the Emissions Test Results in Detail
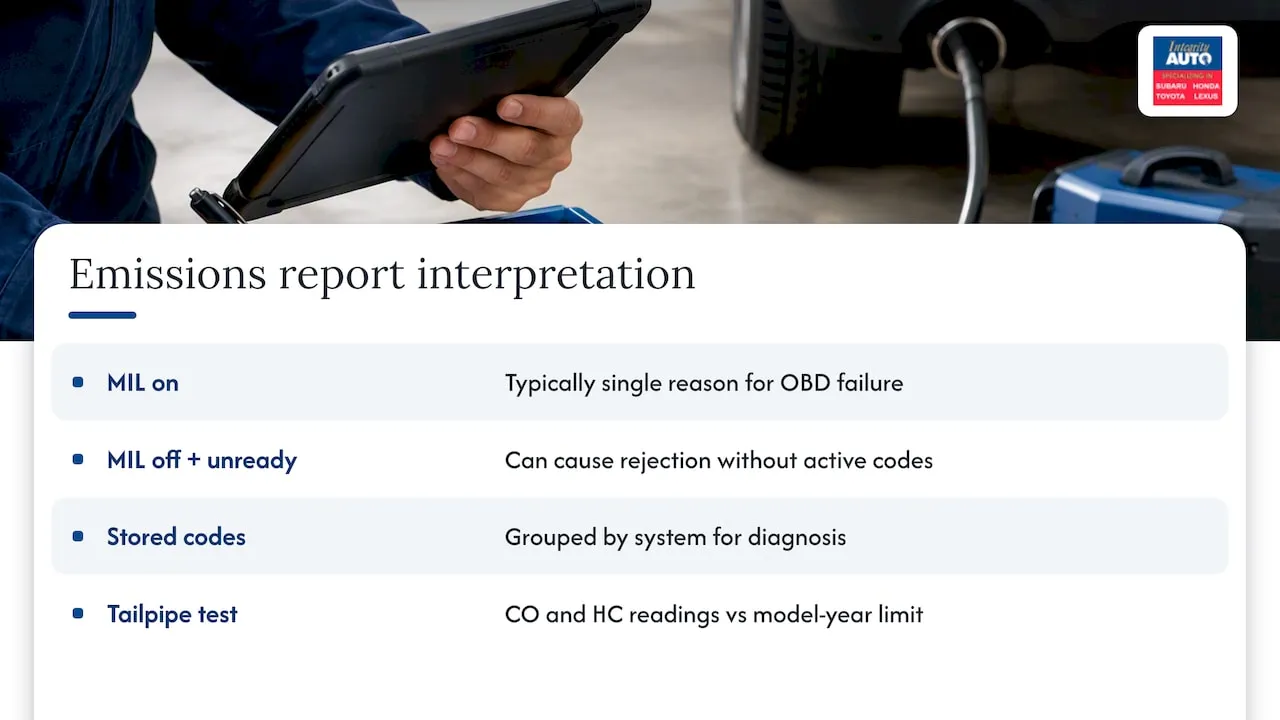
A test report is more than a pass or fail stamp. For an OBD-based test, the printout shows the MIL status at the time of testing, a list of any stored diagnostic trouble codes, and the readiness status of each monitor the vehicle’s computer tracks.
If the MIL was on, that’s typically the single reason for failure regardless of what else the report shows, since a lit check engine light during an OBD test is close to an automatic fail. If the MIL was off but one or more monitors show ‘Unready,’ the vehicle hasn’t completed enough driving since a reset event, and that alone can cause a rejection even with no active codes.
When codes are present, the report usually groups them by system, which is where a technician starts. A catalyst-related code points toward the catalytic converter or the sensors that monitor it. An evap code usually traces back to the fuel vapor system, often as simple as a gas cap issue or as involved as a failed purge valve. A misfire code points toward ignition components like spark plugs, coils, or fuel delivery.
For tailpipe tests on older vehicles, the report lists actual CO and HC readings against the allowed limit for that vehicle’s model year, which gives a direct numeric comparison rather than a pass/fail code list. Bringing either type of report to a technician saves diagnostic time, since it narrows the search before any wrench touches the car.
Diagnosing Common Failure Causes in Toyota, Lexus, Subaru, and Honda Models
Certain failure patterns show up more often on specific makes, and recognizing them speeds up the repair.
On many Toyota and Lexus models, evap system codes related to the gas cap seal or a failed purge valve are a frequent cause of test rejection, often resolved with a simple seal or component replacement rather than anything involving the engine itself. Catalyst efficiency codes also appear on higher-mileage Toyota and Lexus engines, usually tied to an aging converter or an upstream oxygen sensor sending inaccurate readings.
Subaru models, particularly those with boxer engines, can show misfire codes linked to spark plug wear or coil pack issues, which tend to surface as the vehicle approaches typical tune-up intervals. Subaru evap systems have also been known to flag small leaks in fuel system hoses or fittings that are easy to miss without a smoke test.
Honda models commonly show O2 sensor codes as the sensors age, along with occasional evap codes tied to the fuel tank pressure sensor rather than the cap itself. A technician familiar with these platforms can often narrow down the likely cause before even connecting a scan tool, simply based on the code and the model.
Across all four makes, the pattern holds: the printed code rarely means a major engine problem. It usually points to a sensor, a seal, or an aging component tied to the emissions system specifically.
Role of Fuel Quality and Additives in Emissions Test Preparation
Fuel quality plays a supporting role in how cleanly an engine runs, though it rarely fixes an underlying mechanical or sensor fault on its own. Using the octane rating recommended for your specific engine helps avoid knock-related misfires that can trigger a misfire monitor code. Contaminated or old fuel sitting in a vehicle that hasn’t run in a while can also affect how smoothly an engine idles during a test.
Fuel system cleaning additives are sometimes marketed as a pre-test fix, and while a reputable cleaner can help clear minor carbon buildup in the intake or injectors over time, they won’t resolve a failed catalytic converter, a bad oxygen sensor, or a cracked evap hose. Treating an additive as a substitute for diagnosing a stored code is a common mistake that leads to a repeat failure. If a vehicle has a genuine mechanical or sensor issue, an additive simply delays the proper repair.
Where fuel quality matters most is in the weeks leading up to a test, not the day of. Running a tank of fresh, properly rated fuel through normal driving gives the engine computer a clean picture of combustion performance, which supports accurate readings from the oxygen sensors and catalyst monitor.
Impact of Recent Driving Habits on Test Readiness
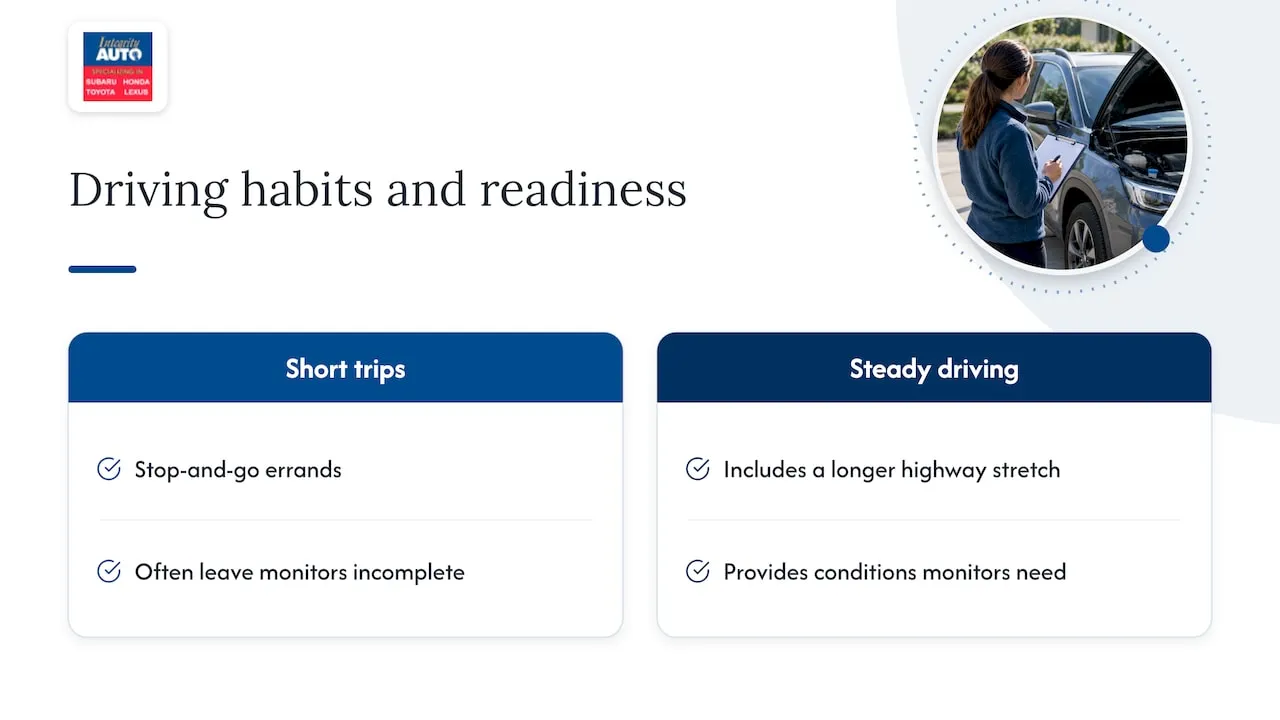
How a vehicle has been driven in the days before a test directly affects whether its readiness monitors show complete. A car that’s mostly driven on short trips around town, especially in stop-and-go traffic, often struggles to complete monitors that require sustained highway speeds or longer run times to finish their internal checks.
A vehicle that’s been sitting unused for an extended period, or one that recently had a battery disconnected for an unrelated repair, will show every monitor as incomplete until it’s driven through a proper cycle again. This is one of the most overlooked causes of an ‘Unready’ rejection, since the owner assumes the car is fine mechanically and doesn’t realize the computer simply hasn’t finished its checks yet.
Steady driving in the days before a scheduled test, including at least one longer highway stretch where possible, gives the monitors the conditions they need to complete. A short errand run the morning of a test is rarely enough on its own, particularly for monitors like the catalyst or evap system that require longer drive segments under specific conditions.
How Seasonal Weather Conditions Can Affect Emissions Testing and Preparation
Cold weather affects both the vehicle and the testing process in a few practical ways. Engines take longer to reach full operating temperature in cold conditions, and some readiness monitors won’t run their checks until the engine and ambient temperatures fall within a specific range, which can delay monitor completion during winter months.
Cold starts also tend to produce higher hydrocarbon emissions briefly while the engine warms up, which is one reason test guidance recommends driving the vehicle for a reasonable distance before testing rather than arriving straight from a cold start in the driveway. For tailpipe-tested older vehicles, extreme cold can affect idle readings temporarily until the engine stabilizes.
Hot weather has its own effects, particularly on the evap system, since fuel vapor pressure changes with temperature and a borderline gas cap seal or hose that holds fine in cooler weather can show a leak once temperatures rise. Vehicles that sit in direct sun for long periods before a test may also show slightly different readings than one driven in from a shaded or covered area.
Scheduling a test for a time of day with moderate temperatures, and making sure the vehicle has had a normal warm-up drive beforehand regardless of the season, helps avoid a result skewed by temperature rather than an actual mechanical issue.
How Integrity Auto Can Help With Diagnostics and Retest Prep
When a test report comes back with stored codes or an ‘Unready’ status, we offer the diagnostic scanning and emissions repair work to get a vehicle back to the testing station with confidence. We read the printed codes and monitor statuses directly, trace them to the actual failing component, whether that’s a catalyst, an evap seal, or an ignition issue, and confirm the relevant monitors are set to ready before you schedule a retest.
Working with an independent specialist rather than guessing at repairs or waiting out a drive cycle blind can cut down on repeat trips to the test lane. Visit our emission testing and repairs page to see how we approach these diagnostics, or check our diagnosis service page for details on scan and diagnostic labor. Reach out to schedule an appointment before your next test date.
FAQ
Is It Hard to Pass an Emissions Test?
Passing isn’t difficult for a vehicle in good repair with the check engine light off and all readiness monitors complete. Most rejections come from a lit MIL, stored codes, or an ‘Unready’ status rather than a genuinely dirty-running engine, and addressing the causes of a rejection ahead of time can help avoid another failed attempt.
How Do I Lower Diesel Emissions Before an MOT-Style Inspection?
Diesel-specific emissions concerns typically involve smoke opacity, and keeping the air filter clean, using properly rated fuel, and addressing any stored fault codes before testing are the most effective preparation steps. A technician scan ahead of time will catch issues like a failing sensor or clogged component before they show up as a test failure.
Is Emission Testing Still Required Where I Live?
Emissions testing requirements vary by state and county, and some areas have scaled back or eliminated testing programs in recent years. Checking your local DEQ or environmental agency’s website is the most reliable way to confirm current requirements and scheduling for your area.
How Do I Schedule an Emissions Inspection?
Most testing programs allow scheduling online or at designated testing stations. Check your renewal notice and the relevant agency’s website for the requirement and timing for your vehicle. Bringing your registration paperwork and an accepted payment method to the appointment helps avoid delays at the station.
What Should I Bring to an Emissions Test Appointment?
Bring your vehicle registration renewal notice, an accepted form of payment, and any recent repair receipts if you’re addressing a prior failure or applying for a waiver. Driving the vehicle to warm it up beforehand and confirming the check engine light is off will also reduce the odds of a rejected test.


